Registering Downloading
Upgrading Installing
Testing Securing
Configuring
Running as Service Uninstalling
We are working on a way to maintain a mailing list without it becoming an overwhelming
task. In the meantime, I encourage you to become a member of one of the discussion
groups on BBeans.biz, and to bookmark and visit BBeans.biz
regularly for updates and news. And you can always drop
us an e-mail directly.
Important: By downloading, you are agreeing to abide by the licenses
covering the downloaded software. The licenses
basically ensure your right to freely use and distribute the downloaded software.
If you modify the software in a way that would be helpful to others, we really
would appreciate you sending
us your improvements.
And of course, the software comes with absolutely NO warranty. Use at your
own risk.
The zip and tar.gz downloads have identical content. They are just packaged
differently.
Please verify downloaded file integrity by comparing your own MD5 checksums
against the MD5 link above.
If you already have Buju installed, you may only wish to upgrade one or
more of its libraries. The three library jar files can be downloaded separately
here:
Keep in mind that scripts, configuration files, documentation, and executables
-- all of which are subject to improvements and bug fixes -- are not in these
libraries.
For a full install:
To test your installation:
- Browse to the
buju/bin directory.
- Windows only: Launch
buju.bat. This will start the Buju
server manually.
- Linux/Unix only: Launch buju with the shell command:
./buju.sh console
This will start the Buju server in a console window.
- If Buju launched successfully you should see the message:
Buju service started on port 2183
- Leaving the Buju service running, browse to the
buju/test
directory in another window.
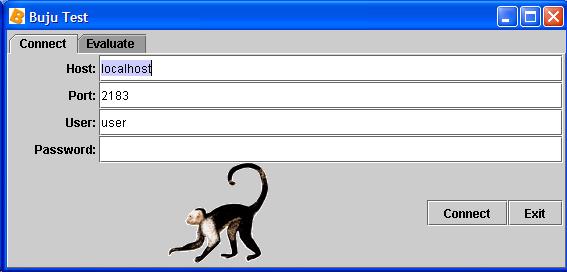
- Launch
bujuTest.bat (Linux/Unix: bujuTest.sh). This
utility is used to start a client connection to the Buju server. It will
prompt you for userID, password, host and port. Respond as follows, pressing the
'Enter' key after each entry:
  UserID: user
  Password: user123
  Host: localhost
  Port: 2183
(Note: you will be instructed on how to change the "user" password later on.)
If you want to move backwards to a prior input, make no entry at the current
input's prompt; just press 'Enter' instead. If you press 'Enter'
at "UserID:", making no entry, the utility will exit.
If the client utility makes a successful connection to Buju you should
see a few lines of instructions (please read them) and finally a greater-than
sign prompt.
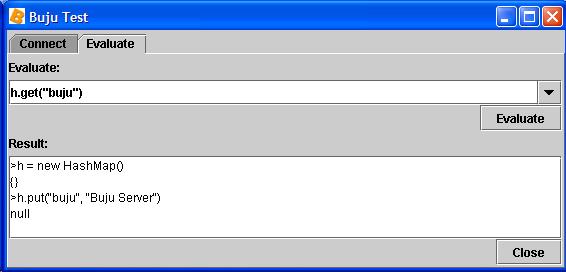
At the prompt:
- Enter in a line of Java code for evaluation (e.g.,
h = new HashMap()
).
- If Buju is working properly, it should respond with an evaluation (e.g.,
{} or null).
- Try other Java code, even code that will create exceptions, to see how Buju
(via BeanShell) handles evaluation.
- When you are finished, enter:
quit
- The test program should terminate, leaving the Buju server still running.
- Return to the original Buju server window.
- Terminate Buju by entering
CTRL-C.
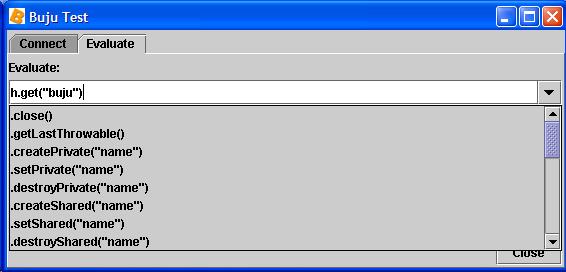
Two test utilities are provided with Buju:
buju/test/bujuTest: runs in a non-graphical console window
buju/test/bujuTestGraphical: runs in a graphical window and has
a selection box for admin commands
Launching the test executable appropriate to your operating system lets you
specify user, password, host and port used to connect to Buju. Once connected,
you can interactively try out Java code as well as admin
commands. These test utilities are only meant for use by an authorized
administrator.
No networked system can be completely secured. Someone with enough time, knowledge,
determination, and the right kind of tools can probably break through any kind
of security. However, Buju has several built-in layers of security which
hopefully will provide ample discouragement to would-be hackers. And there are
security measures outside of Buju which you should implement if you haven't
already. The security layers for Buju are:
- OS security: Protect the Buju installation directory and administration
tools from any unauthorized access. THIS IS PROBABLY THE MOST IMPORTANT STEP YOU
CAN TAKE TO SECURE Buju.
- Firewall security: Make sure Buju is running behind a firewall,
and to the extent possible, make sure everything behind that firewall is trustworthy.
Do not expose Buju to the Internet directly.
- Download security: The integrity of Buju downloads can be verified
against MD5 checksums.
- Host security: Although not normally necessary, in extreme cases you
can isolate Buju on a dedicated computer with severely limited network
access (just the Buju port opened). Even paranoids have enemies.
- Java security: You can optionally add a Java security manager to Buju.
A security manager gives you the ability to control what the Java classes and
packages you use through Buju can and cannot do. For instance, you can
limit where Buju or any other Java package can read and write files. By default,
Buju has full Java permissions meaning it can do anything Java is capable of doing.
- Client application security: Access to Buju is meant to be embedded
in your client application. So your application participates in deciding who can
connect to Buju and what they can run on Buju. Your application
should therefore probably not provide interactive access to Buju, nor unlimited
user access to applications that perform sensitive operations through Buju.
- Secure Sockets Layer (SSL): Because even trusted networks are untrustworthy,
Buju, by default, uses SSL for socket communication.
- User/password lists: Buju is meant to bridge your application
to Java. So in that context, a "user" is really your application, or set of related
applications. By default, Buju requires every connection from a client
(i.e., application) to validate itself with a user ID and password. The server
validates these against a list you maintain using a password tool provided with
Buju. You should treat these passwords with the same high regard as
you might a root or administrator's password.
- IP name/address lists: Buju checks each connection against a
list of allowed IP addresses or names you maintain.
- Custom security: Buju is open source. It also uses scripts for
much of its administrative options. That means you can easily add your own security
checks without having to recompile the source code.
Buju has three main configuration files which must be prepared:
buju/conf/bujuAccess.properties: contains user ID's and passwords;
edited by buju/bin/password.bat (Linux/Unix: buju/bin/password.sh).
buju/conf/bujuHosts.bsh: contains allowed client IP addresses
or names; edited directly.
buju/conf/buju.properties: contains general server options; edited
directly.
Each of these configuration files is dealt with in the following sections:
Users and Passwords Hosts
Allowed Main Configuration
The first thing you should do after installing Buju is change the password
on super user "admin" and on normal user "user".
User ID's and password digests are stored in buju/conf/bujuAccess.properties.
Although this file can be viewed and edited by any text editor, you should only
edit it using the buju/bin/password.bat utility (Linux/Unix: buju/bin/password.sh).
The utility encrypts passwords before storing them in the bujuAccess.properties
file. Your applications should also take steps to protect the passwords used to
connect to Buju. You should treat these passwords with the same high
regard as you might a root or administrator's password.
To edit bujuAccess.properties:
- Browse to the
buju/bin directory.
- Launch
password.bat (Linux/Unix: password.sh). This
is a console window application which maintains buju/conf/bujuAccess.properties.
- A few lines of instructions will display first. Please read them.
- At the greater-than sign prompt, enter:
admin password [for 'password',
substitute your new password for 'admin']
- To change the password for the supplied user 'user', enter:
user password
[for 'password', substitute your new password for 'user']
- You should also set up users and passwords for your applications to use. For
example, enter:
myApp myPassword
- To delete a user, just enter the user ID with no password. For example, to
delete the supplied user 'user', enter:
user
- Note: you cannot delete the 'admin' super user.
- To exit, enter:
quit
- If the Buju service is already running, you must refresh
or restart the service for the new passwords to be recognized.
The 'admin' super user is not valid for logins. It is strictly used for accessing
those sensitive admin commands which require the
admin password. You should not delete the 'admin' super user from bujuAccess.properties,
as this will prevent you from accessing those admin commands.
At this time you may want to test your changes using the graphical buju/test/bujuTestGraphical.bat
utility (Linux/Unix: buju/test/bujuTestGraphical.sh). Like buju/test/bujuTest,
it will allow you to interactively change connection parameters, including the
user ID and password. It also gives you a selection box for admin
commands.
Here are screen shots of the graphical Buju Test windows:
Change the list of hosts allowed to connect to Buju by editing buju/conf/bujuHosts.bsh
directly. This is a simple interpreted Java script which creates the list (actually
two String[] arrays) of allowed host IP addresses (allowedAddress)
or names (allowedName). A host only needs to be identified in either
the name list or the address list, not both. Because this is a script, you can
write code to dynamically create the list if you want. See the script itself for
more information.
If the Buju service is already running, you must refresh
or restart the service for your changes to be recognized.
Buju's main configuration is controlled by buju/conf/buju.properties.
This file can be edited by a text editor such as wordpad or vi. You should review
its contents and make changes as needed.
Buju uses the open source Java Service Wrapper to provide a unified
service API. A portion of any donation
made to support Buju development goes to the Java Service Wrapper project.
Please read their documentation
for a full explanation of their software and its configuration.
Java Service Wrapper uses the buju/conf/wrapper.conf file for
configuration properties. This file can be edited by a text editor such as wordpad
or vi. You should review its contents. You might have to change the wrapper.java.command
option to point to the Java executable you want to use. Otherwise, it usually
requires no modification.
Linux/Unix Service
To install Buju as a Linux/Unix service, you must add it appropriately
to the inittab startup procedure. The inittab procedure
has evolved from Unix to Linux and from version to succeeding version. The following
steps will work under recent versions of Linux (specifically Debian Linux 3.0.6).
If you are installing on Unix or an early version of Linux, you might have to
take slightly different steps. But then, if you are installing on those OS versions
you are more of an OS expert than myself. Please send
along variations or corrections which work for you.
To install Buju as a Linux service, enter the following shell commands,
substituting the full path to the Buju installation directory for $BUJU_HOME:
  cd /etc/init.d
  ln -s $BUJU_HOME/buju/bin/buju.sh buju.sh
  cd ../rc2.d
  ln -s ../init.d/buju.sh S99buju.sh
Those commands create (ultimately) a link to buju/bin/buju.sh,
the Buju service administration script, in the directories /etc/init.d
(the central place for inittab start/stop service executables) and
/etc/rc2.d (the run control level 2 link directory). Run level 2
is usually the default multi-user run level for Linux, but if you use other run
levels, you may want to add the same symbolic link as you did in /etc/rc2.d
to the appropriate /etc/rc directory. The 'S99' appended to the front
of the link name is a naming convention which says, this is a start-up ('S') link
to a service which should be one of the last things ('99') started.
Because Buju responds to the kill signal, which is normally sent to
running processes when you shutdown, you don't have to add a link to the standard
shutdown link directory /etc/rc6.d.
The buju/bin/buju.sh script is also your means to manually administer
the Buju service. Usage is:
./buju.sh action
When launched, you must specify an action to the script. The options can be
displayed by launching the script with no action specified.
The following actions are of interest:
console - run in a console window.
start - run as a daemon (this is what /etc/rc2.d/S99buju.sh
will accomplish).
stop - stop the daemon.
restart - restart the daemon.
status - display the status of the service.
To remove Buju as a Linux/Unix service, just remove the links you added
from the appropriate /etc/rc directories (e.g., /etc/rc2.d/).
Windows NT Service
Buju can only be installed as a Windows service on a Windows NT-based
operating system such as Windows XP or Windows 2000. For earlier Windows operating
systems such as Windows 98, you can have Buju start up automatically by
placing a shortcut to buju/bin/buju.bat in your "Start\Programs\Startup"
folder.
To install Buju as a Windows service:
- Make sure you are logged in as an administrator.
- Browse to the
buju/bin directory.
- Launch
InstallBuju-NT.bat. This will add Buju as a Windows
service as configured in buju/conf/wrapper.conf, and then exit.
- At this point, Buju will be installed as a service, but it won't be
started. To start it, you can either reboot, or open up your Services manager
through the "Start" button, "Control Panel", "Administrative Tools", "Services"
and select Buju from the list of services and click "Start".
To remove Buju as a Windows service:
- Browse to the
buju/bin directory.
- Launch
UninstallBuju-NT.bat. This will remove Buju as
a Windows service and then exit. It may only mark the service as disabled until
you reboot, at which point it will be removed from the Windows services list.
Refreshing or Restarting the Buju Service
If you simply want to have a running Buju service recognize changes you
have made in buju/conf/bujuAccess.properties (users and passwords),
buju/conf/bujuHosts.bsh (allowed client hosts), or buju/scripts/bujuInterp.bsh
(initial interpreter script), then make a connection to the server and issue the
admin command .refreshServer.
There a two basic ways to stop and/or restart the Buju service:
- From the administrative scripts at the operating system level. This stops
and optionally restarts the JVM and kills all current connections.
- From a client connection using admin commands.
This leaves the JVM, and all current connections, running, and optionally creates
a new successor server.
The first method is more drastic, but is the only way provided to stop the
server JVM. The second method preserves current connections, but the old server
instance and new successor server instance share absolutely nothing except their
configuration properties.
To stop or restart Buju using the first method:
- Windows: Browse to Services under the "Start" button, "Control Panel", "Administrative
Tools". Find Buju and select the "Stop" or "Restart" option.
- Linux/Unix: Browse to
buju/bin, and launch buju.sh
with either the "stop" or "restart" option. For example:
./buju.sh restart
To pause, resume, stop, restart or refresh the server from within a connection,
use the following admin commands:
You can always use the provided test utilities
to establish an interactive connection to Buju for administrative functions.
Service Logs
The Java Service Wrapper component of Buju logs events of interest. Logging
is configured in buju/conf/wrapper.conf. By default, a text log is
kept in buju/logs/wrapper.log. In particular, System.out
and System.err output from within the JVM is captured in this log.
- Make sure no application is depending on the Buju service.
- If Buju has been added as a service, remove it as instructed above.
- Delete the
buju directory and all its contents. Buju does
not make Windows Registry entries.
|
